
Tips on how to improve your drawing ability
Further our previous discussion on the merits of the ability to sketch and how sketches are used in studios, I now present a list of hints and tips that has helped me improve my drawing ability.
Tips on how to be a sketch god! (or at least get you close!):
1) Know how you draw?
Do you draw lines by moving your wrist, elbow or shoulder? There is really no right or wrong way to draw, though most purist advice to use draw from the shoulder. The reason for this is really about the type of sketch you want to create.
Wrist action encourages “tight” sketches and very good for a controlled sketch style. Drawing from the shoulder gives you a more sketchy and loose lines as you are literally firing off the lines. If you want the create that Emotion sketch this is the technique to use, but frankly this style requires a lot of practice in controlling your lines. Drawing from the elbow gives you the middle ground. At the end of the day pick the technique that you are most comfortable with.
2) Practice.
When I started my design career, I drew everything every day. I refused to use tracing paper, rulers or erasers. If you want to improve your sketching skills you need to invest time and effort. Practice drawing buttons, perspective cubes, and horizontal or vertical lines. I have pages full of horizontal lines of at least 15cm long.
3) Understand the concept of varying line weights.
One of the good tricks of sketching is to use different line weights or thicknesses. Basically you use thicker lines for edges further from the eye, and thin or dotted lines for edges closer to you.
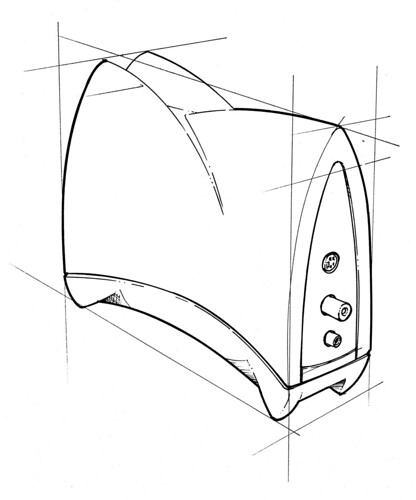
Varying line thicknesses give your drawing movement, and bold outlines in particular makes the sketch jump out of the page.
4) Use intentionally sketchy lines by keeping your arm loose.
In other words lines don’t end at the junction, keep them going and shoot them off. Creating loose sketchy looking lines is really a technique that can be easily learnt.
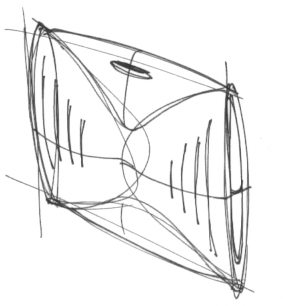
Carefully creating boundary boxes in light lines, as well as over drawing shapes gives a cool sketchy feel.
5) Redraw your sketches and present them in a better light.
I have seen many portfolios of designers with a few years of experience still include sketches from their school days. Now if you have been following my advice your sketching ability would have improved, so re-draw those old and ugly sketches, there is nothing and no-one saying you should not.
This time, perhaps, take the opportunity to refine it to the level that you are happy with?
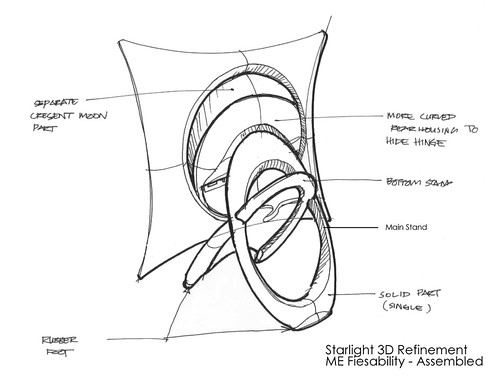
6) Use callouts with cool handwriting.
I don’t think I have to say much more about this, but the fact that annotations at strategic places does makes a sketch look cool. Oh and if your handwriting is not too good, I do suggest you pick up a book on drafting and practice.
7) Use the photocopier to save redrawing a good part.
I only recommend this if your sketching ability is fairly good or if you are rushed for time. Otherwise redraw it from scratch. Photocopiers work great with Liquid Paper or Correction Fluid.
8) Draw big, but show it small.
Actually a great presentation trick is to scan in your images, touch up the lines with Photoshop, and present them in a collage. Such a presentation strategy makes average sketches look good, and good sketches look GREAT!
9) Draw small, but show it big.
If you have still a tough time sketching from your elbow or shoulder and if your line control is still not the best, what I suggest is to draw a thumbnail and blow it up on a photocopier or scanner. This way you would have an underlay to redraw your sketch with the same look and feel but with thinner lines.
10) Use layouts created from 2D or 3D software.
Talking about the use of an underlay, use this time tested trick to create your sketches with a correct perspective, or for you to create a 2D orthographic sketch in proportion.
Edit: One more thanks to sammyb
11) Draw with a pen.
From what I’ve been told, sketching with a pen, instead of a pencil, is really about losing the ability to erase your lines, or erasing your mistakes.
The idea here is that drawing with a pen forces you to think before your draw, and as you cannot erase your work, and you will then draw with a determined solution in mind. In other words, drawing with a pen trains your mind to think the design solution through before you actually put it on paper. It will make you a much better designer.
The other reason is that, you stop being precious with your sketches and drawings, i.e. you draw and if it does not look good, you don’t get to erase and draw over, but you throw your drawings away and start fresh. This re-setting and starting from scratch seems to help make you a better designer, so the say!
There you go, 11 great tips to get you out of the stable with a flying start. However at the end of the day, all these 11 points will all come to naught if you don’t practice Practice and PRACTICE! So do hang in there as the pain will not last forever. Sketching and drawing is like riding a bike, once you get it you will never forget it.
Daniel G Galahad
February 2, 2019 at 6:46 amI learned a lot, thanks 😊😊😊
thoufiq
August 12, 2015 at 7:49 pmthank you very much for you guidelines.very useful information for me.can you show me any video.than much more easy to understand the Technics
Amber
July 9, 2015 at 4:42 amThis is great advice, especially number one. I have always just drawn on a sort of autopilot and my go to way of drawing is by the wrist. As soon as I read the first point I grabbed my sketch book and being aware of how I was drawing gave light to the solution of one of my biggest problems, I can never draw smooth lines. Somehow I never even thought of changing where I move my arm, I am not even kidding. Thank you.
Clarence
June 25, 2015 at 8:08 amThank you so much for these!
I’m going to study Graphic designing from next year in uni, and my drawing skills aren’t really well — but I have a good eye for design.
I’ll practice these steps tomorrow with a pen on paper!
nava
June 15, 2015 at 3:05 pmwell… ur drawing is also resemble my 2d teacher. also i am aware that u are full experinced…… but i need use my drawing habit for toon boom soft….. so pls tell me how use it………..?
Lady M
January 20, 2010 at 8:55 amthanks for all the advice it gives me hope as i was debating on whether this was the road to take as i think my drawing is not up to par
Ges Cocker
December 9, 2009 at 12:10 amExcellent examples and first rate tips. Can i use these with my Y11 graphics students? Anymore tips on things like good annotation would be great. Keep up the good work
Syed Farhan
August 16, 2008 at 4:41 pmJust a message from a sketching freak
try try until u die 😉 theres always hope
Every successful person has a painful story.
Every painful story has a successful End.
So !Accept! the !Pain! and get ready for
!Success!
tthomkatt
July 18, 2008 at 8:10 amsounds familiar, think my instructor must have seen this website>
___
July 3, 2008 at 5:32 pmThanks a lot 😉
DT
September 12, 2007 at 9:25 pmHi David,
Thanks for your comments and for visiting.
David Therrien
September 12, 2007 at 9:13 pmWOW! Thanks a lot! It really helps me!
I will be able to rebuilt my portfolio and create my comic book faster!
You are so right…
THANKS AGAIN!
Pietro
May 6, 2007 at 4:44 pmI was thinking that it would be great to have some video examples of these tips!
Design Translator
May 6, 2007 at 4:40 pmHah-hah, I’ll see what I can do so please keep in touch?
Pietro
May 6, 2007 at 4:30 pmVery useful tips. I’m going try them out asap! Can we have more? Maybe advanced tips? Thanks!
Rblackmore
May 4, 2007 at 10:15 amAh, I see. I try to draw a couple hundred parallel lines everyday(horizontal, vertical and oblique) but am not seeing improvement. I know I shouldn’t expect improvement over-night but I feel like this might be one of those things that can’t actually be improved(like the human body can’t actually get better at drawing straight lines). I hope it just takes a lot more time. Also, when practicing I don’t draw quite so big, I usually draw on A8(thats normal printer paper, right?) and draw lines ranging from about .5″ to 10″ or so. I took what you said about studying the arc/angle of the arm movement as this morning(about 10 hours ago as its night here) I was doing just that. I grabbed a pen and paper and moved my forearm and hand through its natural arc without moving the elbow and realized that in some of its range it creates a much more straight line(about the center of the arc) while at the sides of the arc it draws a much more curved line. Tell me what you think, you probably understand a LOT more than me! 🙂
Design Translator
May 4, 2007 at 8:38 amActually what I mean is to draw your lines in 45 Degree. But ultimatly it does not matter, as long as you draw it from one end of the paper to the other. The important thing is the repeated parallel lines.
Rblackmore
May 4, 2007 at 8:30 amThanks so much, you’re a life saver man. I’m not sure if I understand what you mean though, should I turn the paper at a 45* angle? Sorry, just not quite clear to me.
I’m trying to figure out a good plan to get my line control up to par and its not easy! Well, I’ll try your exercises some more, see if this doesn’t help. Thanks again!
Design Translator
May 4, 2007 at 8:02 amYes it will. Another thing you can do is take a piece of A4 paper, and at its 90 degree corner draw diagonal lines from the top left to lower right. (Assuming you are right handed)
You can use the 2 dot technique. But i find that too much of a jump for learners. By drawing parallel lines in sequence it actually forces you to study the arc or angle your arm moves and trains your muscles to get a straight line working for you every time all the time. Its a more structured approached.
After that you can have a go at the 2 dot technique.
Good Luck.
Rblackmore
May 4, 2007 at 7:51 amWow, quick! 🙂
Anyhow, I just drew a few boxes and drew straight lines in the boxes like you said. Will this help me develop my “straight line skill”? I’ve heard that the best way to practice to draw straight lines is to use draw 2 dots and connect them with a single straight line. Have you heard of this or have anything to add? Thanks, and I very much appreciate your willingness to help.
Design Translator
May 4, 2007 at 6:09 amIts how you draw the lines. So if I may suggest, first draw a cube, then inside draw lines that are parelle to one edge moving till yuo hit the other edge and you will have a cube face of lines.
To make it more challenging, do that face in perspective!
Also it takes practice to get those perspective “draft man” lines going. But if you ensure that in every sketch you include the control lines you will get good. So good that eventually you cna draw the shape WITHOUT the draft lines!
Good Luck and do let me know how it turns out for you.
Rblackmore
May 4, 2007 at 5:49 amHi,
I found this very useful. I have one question though: Do you really notice a difference in your line control from practicing drawing straight lines? I’d like to be something of a “freehand draftsman” and I’ve been practicing drawing straight lines, circles, boxes for about a month now and can’t tell any difference. My lines aren’t coming out any straighter. Also, I draw from the elbow as I believe it is the most natural arc to use. Well, tell me what you think, and thank you very much for your time!
Design Translator
February 25, 2007 at 12:22 pmHi Spira,
Thanks for stopping by and taking the time to leave a comment.
Spira
February 25, 2007 at 9:24 amAwesome 😉 thanks.
Design Translator
December 21, 2006 at 5:27 pmHi isanov,
THANK YOU for your wonderful comment and you are so right!
isanov
December 21, 2006 at 2:46 pmwell n very clearly stated.
if i may add : on #11, draw with pen makes you know where you’ve been, learn from mistakes n not do the same mistake over n over.
in fact, sometime great design comes from scrapped sketches…
welldone